|
Note
This procedure was carried out on a 1996 Saab 9000 Aero. Earlier (non-CS)
models and pre-'95 CDs were fitted with a different motor.
Introduction
The headlamp wipers on my 1996 9000 Aero had for some time been parking
erratically. The final straw came one evening when I switched on the
ignition, the windscreen washer pump started running and wouldn't stop
until I switched off the ignition. Pulling various fuses isolated the
problem to the headlamp wipers (the windscreen washer pump stopped running
when the headlamp wiper fuse was removed). I removed both wiper motors
to investigate and in the process, found that the right-hand headlamp
wiper motor was the culprit. When I removed the motors for examination,
this is what I found and how I dealt with it.
Time required
Having removed the headlamp wiper motors, I tinkered with them periodically
over a period of time. I consider headlamp wash/wipe a convenience rather
than a necessity. I'm sure I could have done the following work in an
evening, but other people might come across different problems that
may take longer to fix.
Tools required
The tools required will vary according to the problems found.
To gain access to the unit:
- Small electrical (flat-bladed) screwdriver
To carry out my particular repair:
- Small long-nosed pliers
- Wire cutters
- Soldering iron
Procedure
- Unclip the wiring harness from the clip on the rear of the unit.
- Using the small electrical screwdriver, carefully prise
each of the retaining clips on the backplate free. On the first unit,
I broke a number of these, but the remaining clips were enough to
hold the backplate on firmly on re-assembly. The small clips come
free fairly easily, but the larger ones are very difficult to free.
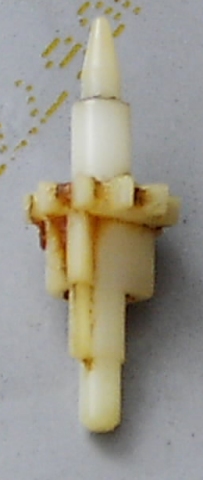
- Remove the arm and plastic guide as shown.
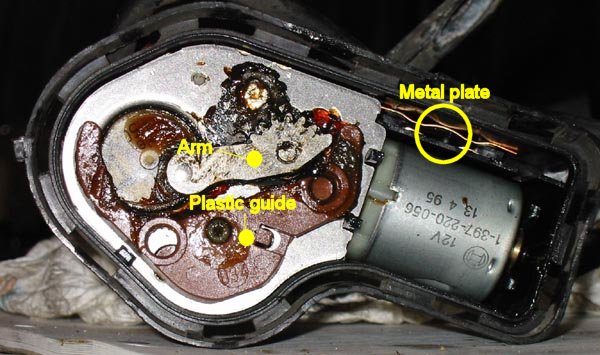
- Pull the metal plate outwards as far as the spindle will allow and
pivot it around the spindle to gain access underneath.
- If the motor was not self-parking properly, check the parking switch.
This is a normally-closed switch that connects the motor to the permanent
supply (red wire). The small gear opens this switch every five sweeps
of the wiper, and when the switched supply (yellow wire) is removed,
this stops the motor once it reaches the parked position. On one of
my wiper motors, this switch was not making contact (the spring contact
was bent). The result was that the motor would stop immediately the
wash/wipe switch was released, rather than continuing to the park
position. I removed the small gear and bent the spring contact so
that it was just making contact and a bit more, then replaced the
small gear, making sure it engaged properly with the switch contact.
Don't bend it too far or the park position may end up being incorrect.

- The motor can be tested by connecting the black wire on the connector
to 0V and applying 12V to the yellow wire. The motor should run while
the yellow wire is connected to 12V. To test the self-parking function,
connect the red wire to 12V, then momentarily apply 12V to the yellow
wire. The motor should perform five sweeps, then stop.
- While performing the above test on my right-hand motor (they are
both stamped "L" or "R") I saw the motor glow
(presumably sparks) and issue smoke. There are two ways to tackle
this and I have tried both:
- Run the motor off-load to clean the commutator and brushes
- Dismantle the motor and clean it
- Both methods require the motor to be removed. I did this by prising
it up from the rear, taking care not to disturb the contacts around
it. I did disturb the contacts and the square metallic plate
marked (but not very visible) in the top photograph fell out. When
replacing this between the copper strips, note that it goes in diagonally,
i.e. one corner will be facing upwards when fitted. This plate connects
the strips electrically, and is essential for correct operation.
- Running the motor off-load is the simpler method. I have had good
results just by doing this. Simply connect a 12V supply to the two
terminals and let it run until it is running at full speed and no
more sparks are seen. Then reverse the connections and repeat in the
other direction. This serves two purposes: it guarantees it has been
driven in the normal direction without having to think too hard about
it and also does appear to perform some additional cleaning since
the sparks appear initially in both directions. This may be all it
needs. If not, try dismantling it.
- Although the motor looks as if it is not designed to be dismantled,
I weighed up the pros and cons: dismantle the motor and risk having
to pay £100 for a new unit if I can't fix it, or give up and
pay £100 for a new unit anyway. Needless to say, I had a go.
When I first wrote this article the motor (Bosch part number 1-397-220-056)
was still available but it was subsequently discontinued in 2014
Once removed, I opened up the motor by prising up the retaining tabs
with a small electrical screwdriver.

- The following requires great care and a degree of dexterity.
Work in an area where you will be able to find small parts if they
spring free.
Withdraw the plastic end of the motor. This contains the graphite
brushes. They are spring-loaded against the commutator and as soon
as you withdraw this part, they will spring towards each other.
- Check the condition of the commutator (the copper contacts on the
spindle). Mine was fine, but I had expected to find some burning,
given the sparks and smoke I observed above. If there is evidence
of dirt or burning, clean the commutator with very fine emery
paper.
I used a scalpel blade to remove graphite deposits between the commutator
segments. Others have since reported that the graphite between the
segments was alone sufficient to cause the sparks and smoke.
- Check the condition of the brushes. This was part of my problem!
One of the brushes had rotated 90 degrees and instead of its curve
following that of the commutator, it was now at 90 degrees to the
curve of the commutator. This left very little contact area between
the brush and commutator, hence the sparks and smoke. It had probably
stalled in this position on the car, which is why it wouldn't park.
This is where the manual dexterity came in. I had to carefully prise
the two brush spring clips apart far enough to re-seat the brush into
its spring clip.
- More manual dexterity: Carefully place the plastic end over
the spindle until the brushes touch the end of the commutator. Then,
using a small screwdriver (or something even smaller!) manipulate
the brushes over the edge of the commutator. I managed to tilt the
plastic piece slightly and work one of the brushes onto the commutator,
then follow with the other. There isn't much of a gap to work through
at this stage.
- I didn't bother to bend the retaining tabs back as the mounting
arrangement for the motor keeps the plastic end in place. This should
make it a bit easier to dismantle if I need to do it again.
- Reassembly: Refit the motor and the worm-drive.
- Fit the small parking gear with the flat part of the cam next to
the copper contact, then gently rotate it anticlockwise until it stops
against the end of the contact.
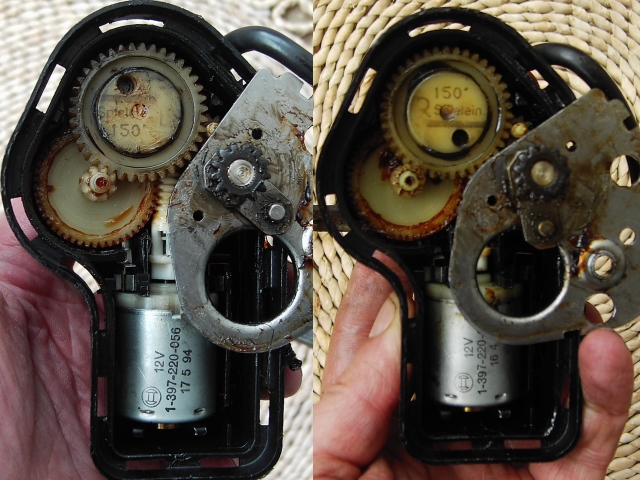
- Refit the other gears. The main gear must be positioned correctly
to ensure that the park position is correct. Insert it so that the
"L" or "R" is upright and the line marked on the
gear is horizontal, as shown in the photo. The exact alignment is
not critical but it needs to be approximately correct.
- Swing the plate over and press it firmly into place.
- Refit the metal arm and push the spindle back into place to engage
its gear with the teeth on the arm.
- Refit the brown plastic guide.
- Refit the back of the motor. It may be as well to test the motor
without pushing this fully home but keep some pressure on it while
testing to keep the moving parts in place. Once satisfied, press the
back fully into place, ensuring the clips engage fully all round the
edge.
- Test the motor in the car. In my case, everything worked fine,
except that the windscreen washer pump kept running until the RH headlamp
wiper reached the park position. This tied in with the original problem
(except that then, the RH wiper never DID reach the park position,
so the washer pump ran all the time). Thanks to the reader who suggested
that there is a diode in the wiper motor to stop current from flowing
back out of the yellow wire (to the washer switch and hence to the
washer pump) while the motor is parking. I may not have thought of
it for ages, if at all! The diode appears to be sealed within the
casing.
Since it appeared that the diode had failed as short-circuit (rather
than open-circuit, fortunately), I remedied the situation by cutting
the yellow wire and placing a new diode in series. I chose a 1N5401
diode. It is rated at 3 Amps and 100V. I measured no-load motor current
at 0.5A and by placing a load on the motor couldn't manage to get
it to draw more than 2A. A 1N5400 would do as it is rated at
3A and 35V. I just happened to have the 1N5401 handy. I connected
it with the cathode (silver ring indicates the cathode end) towards
the wiper motor unit rather than the connector.
The 1N5400 series diodes are an industry standard and should be available
from just about anywhere that sells electronic components.
- After re-installing the motors, everything now works fine.
|