|
Introduction
On Saab 9000s equipped with air conditioning (and/or climate control) the air
conditioning compressor is driven by an electromagnetic clutch. In normal operation,
the clutch cycles on and off regularly. Over time, however, the clutch wears
and the air gap between the clutch and the driven plate increases to the point
where, under certain circumstances, the magnetic coil can no longer pull the
plate against the clutch. The first sign of failure is that the air conditioning
stops blowing cold when the under-bonnet temperature rises significantly. This
is because the high temperature causes the coil resistance to rise, reducing
the available current and consequently the strength of the magnetic field.
I took the car to an air conditioning technician, thinking there was a problem
with the refrigerant. After an unsuccessful attempt, he finally verified that
there was voltage to the clutch and proved the cause of the problem by tapping
the clutch driven plate with a hammer with the engine running, whereupon the
clutch engaged and the compressor started running. I watched him fix it using
the following procedure. Since I have seen a number of reports of this problem,
I felt it worthwhile to dismantle the clutch again in order to document the
procedure for other Saab owners.
This procedure was performed on the Seiko compressor on my '96 Aero. Some other
models are fitted with a Sanden compressor. While the same principles apply
to the Sanden compressor, certain details may vary. However, after lengthy discussion
with other 9000 owners, it appears that this problem is almost exclusively confined
to the Seiko compressor.
Time required
Around 10 minutes.
Tools required
- 5mm Allen key or hexagon bit.
- Feeler gauge
- Screwdriver to lock the driven plate.
- Thread locking compound.
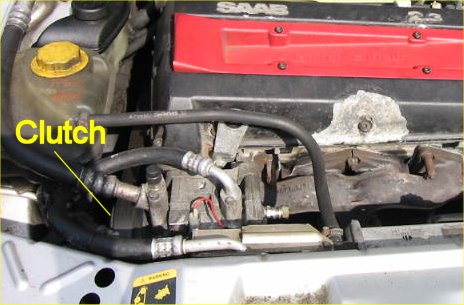
Procedure
- Locate the compressor clutch as shown below.
- Using a feeler gauge, measure the air gap. It should be between 0.4mm
and 0.8mm (0.016" and 0.031")
for the Sanden compressor and between 0.3mm and
0.6mm (0.012" and 0.024")
for the Seiko compressor. If it is too large, adjust it by following the procedure
below.

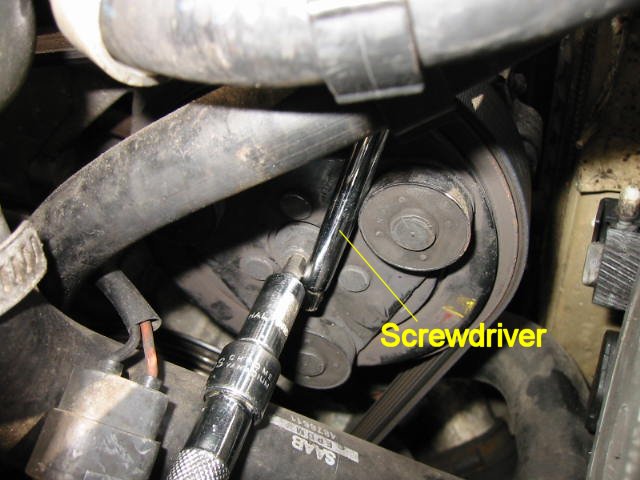
- Using a 5mm Allen key or hexagon bit, unscrew the central retaining screw.
Use a screwdriver to stop the driven plate (and compressor shaft) from turning.
Remove the screw and its washer.
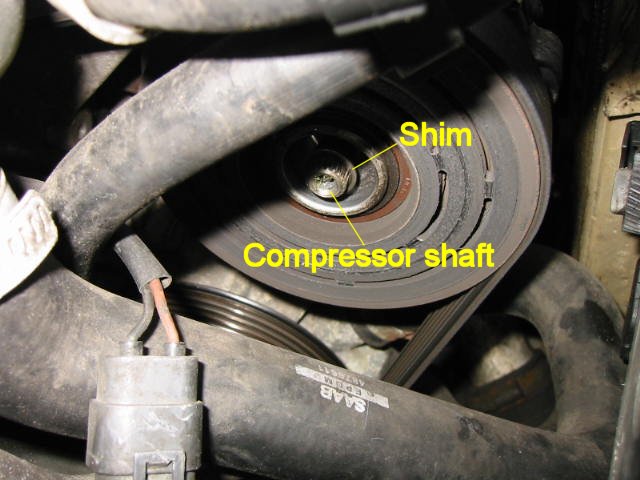
- Carefully remove the clutch driven plate, taking great care not to lose
the shims underneath - on my car, the shim was stuck to the plate and fell
into the engine bay as I withdrew the plate. There was only one shim, but
since the gap on my clutch had already been reduced, I know that at least
one shim had already been removed. The driven plate and shim can be seen below.
The wear on the plate after almost 150,000 miles is quite apparent.

- Remove one or more shims to achieve the required gap. Refit the remaining
shim(s) onto the compressor shaft. On the Seiko compressor, each shim is approximately
0.5mm thick.
- Refit the driven plate. I found that the retaining screw had had thread
locking compound applied, so I applied fresh threadlock. Refit the screw and
washer and, using the screwdriver to stop the driven plate from turning, tighten
the screw. I don't have a torque figure.
- Re-check that the air gap is now within specification.
|