|
Introduction
At least four types of turbocharger have been fitted to the Saab 9000: Garrett
T3 (oil-cooled), Garrett T3 (water-cooled), Garrett T25 (water-cooled) and Mitsubishi
TD04 (water-cooled). The procedure documented below was performed on the Mitsubishi
TD04 fitted to my '96 Aero (this was only fitted to manual-transmission Aeros),
but the T25 should be similar and I try to describe the differences for the
T3 models where I am aware of them. Differences from the car I performed the
procedure on are denoted like this.
I welcome comments from people who have performed this procedure with other
turbos.
My reason for removing the turbo was to re-tap the hole left after removing
a seized exhaust flange stud that was responsible for an exhaust leak. I also
took the opportunity to have an engineering shop drill out and re-tap one of
the bolts holding the oil return pipe to the turbo, which had also seized, making
it impossible to attend to a slight oil leak at that joint.
Time required
Naturally, this will vary with both the individual and what they find when
they get there. However, as a general guide, allow about two hours for removal
and the same for refitting.
Tools required
I assume some basic tools, such as spanners (wrenches), socket set, etc. However
I do not assume you will already have all the necessary metric socket and spanner
sizes, especially if you are in the USA. Here is a list so you can make sure
you have all the necessary sizes before you start.
N.B. These were the tools I found necessary for the TD04. Other turbo installations
may require different tools.
Spanners
Sockets
Other
- Torx T25 bit
- Torx T30 bit
Other materials
- Turbo-to-manifold gasket
- Oil return pipe gasket
- New copper washers for pipe unions, and sealing washer for oil feed pipe
- New exhaust flange nuts (copper, self-locking)
- Coolant
- New engine oil and filter recommended if fitting a new or reconditioned
turbo (in any event, a little engine oil to prime the turbo).
Procedure
- On water-cooled turbo installations, drain the coolant either by unscrewing
the radiator drain plug or by disconnecting the bottom hose from the radiator.
- On cars fitted with an air mass meter, remove the
wiring from the air mass meter and disconnect the hoses from either side.
Remove the air mass meter.
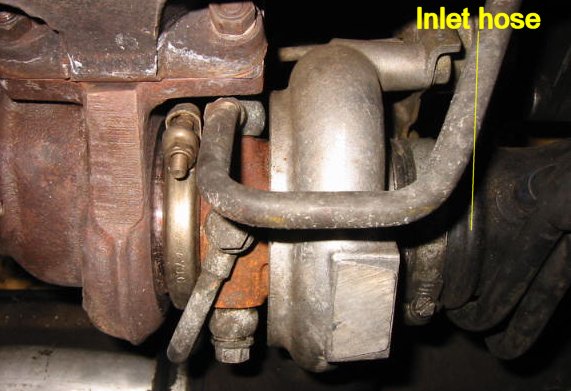
- Undo the clip holding the inlet hose to the compressor and disconnect the
inlet hose. Place a clean rag in the inlet to prevent dirt ingress.
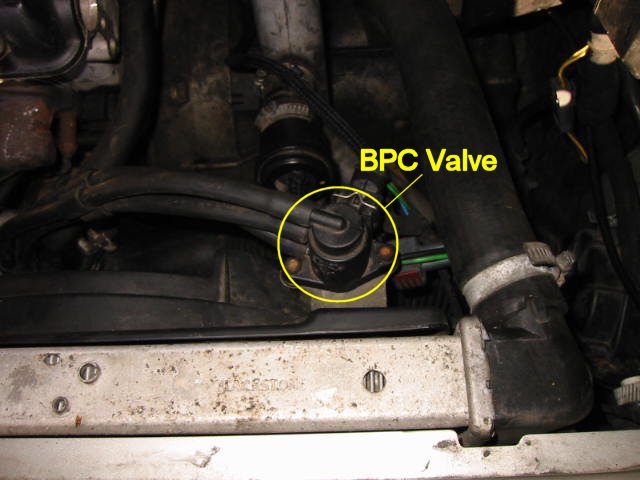
- On all cars other than LPT models, locate the BPC valve on the radiator.
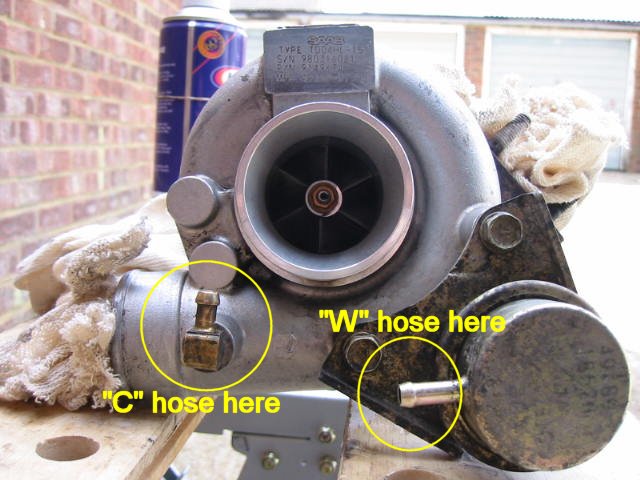
If the hoses are not marked clearly, mark the hose that runs to the turbo
compressor "C" and that going to the wastegate actuator "W".
Disconnect the "C" and "W" hoses. Remove the two Torx
T30 screws holding the valve onto its mounting bracket and move the valve
out of the way.
- Disconnect the wiring to the radiator fan. Using an 8mm socket, remove the
screws holding the radiator fan assembly to the radiator and remove the fan
assembly.
- On cars fitted with the T3 turbo:
Remove the air conditioning compressor drivebelt (if fitted).
Place a container under the oil cooler to catch oil spillage and and unscrew
the upper union. Unscrew the mounting bolt on the oil cooler and move the
oil line to one side.
Unbolt the air conditioning compressor (if fitted) and place it carefully
to one side, leaving the hoses connected.
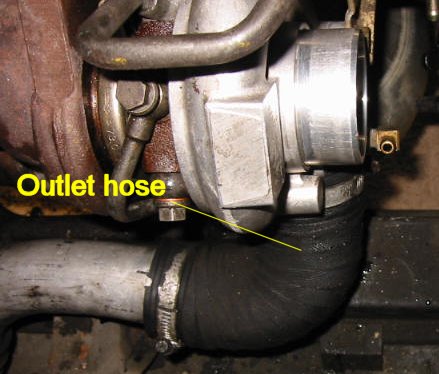
- Undo the clip holding the outlet hose to the compressor and disconnect the
hose. Place a clean rag in the outlet to prevent dirt ingress.
- Unscrew the three nuts holding the downpipe to the turbo. The upper front
and lower nuts are fairly easy to get at with a short 13mm ring spanner (a
long one may foul on the radiator when tackling the lower nut). The rear nut
is a little less accessible, especially with the aftermarket 3" downpipe
fitted to my car. The best solution I have found for the rear nut is to use
a 13mm socket on a 1/4" drive sliding T-bar, supplied with a small 1/4"
socket set. The sliding bar can be manoeuvred to clear the engine block and
downpipe as the nut is turned.
An alternative for the rear nut would be a 13mm crescent wrench, which is
a spanner with a gentle 90° bend.
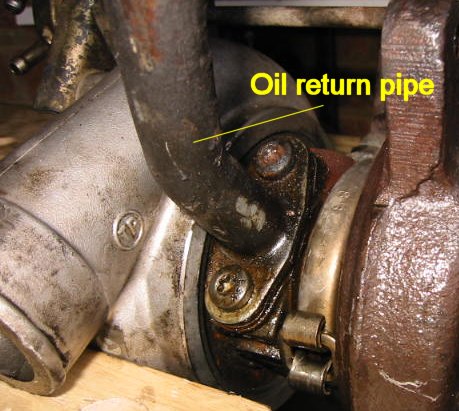
- Remove the two bolts (Torx T25 or 10mm) holding the oil return pipe to the
underside of the turbo. Release the clip holding the pipe to the engine block
and remove the pipe.
- Undo the unions connecting the oil feed pipe to the turbo and cylinder block
(12mm spanner) and remove the pipe.

- On water-cooled turbos, disconnect the lower coolant pipe from the turbo
and from the water pump (12mm spanner). Remove the pipe. Upper coolant pipe
union on the turbo is still inaccessible, but disconnect the upper coolant
pipe union on the cylinder head.

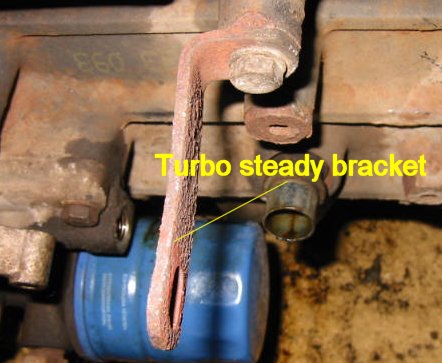
- Remove the 13mm bolt holding the steady bracket to the turbo.
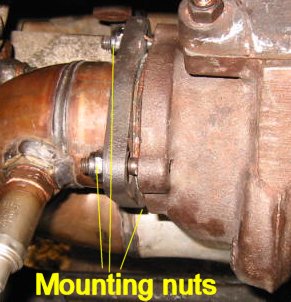
- Using a 13mm ring spanner, remove the four nuts securing the turbo to the
manifold and remove the turbo.
- On water-cooled turbos, disconnect and remove the upper coolant pipe.
Refitting:
- Ensure all the downpipe studs are fully screwed into the turbo. Any which
were inadvertently loosened during the removal process, if not screwed in
now, are liable to seize in the partially unscrewed position. This is likely
to lead to exhaust leaks which cannot be corrected without removing the turbo
to unseize the studs, or worse, drill them out. (This was the reason I had
to remove my turbo in the first place).
To screw in any loose studs, apply a dismantling lubricant (such as "Plus-Gas"
or "Liquid Wrench") lock two M8 nuts together on the stud and work
the stud until it is free. Then screw the stud in as far as it will go.
Alternatively, and highly recommended, renew all three downpipe studs.
- On water-cooled turbos, refit the upper coolant pipe to the turbo, using
a new copper washer. Note that this union will be accessible after refitting
the turbo to the manifold so position it carefully before tightening it with
a 12mm spanner.
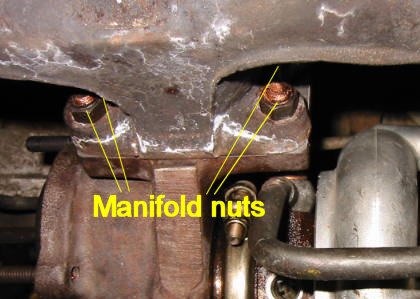
- Saab recommends using new manifold studs. My turbo and studs were quite
new, so I decided to forego the expensive Aero manifold studs and re-use the
existing studs. I did, however, renew the turbo-to-downpipe studs.
Refit the turbo to the manifold with a new gasket, applying anti-seize
compound to the nuts. It is next to impossible to get a torque wrench onto
the nuts, but try to achieve as near as possible to 22Nm
(22lbft) for T25/TD04 turbos and 40Nm
(30lbft) for T3 turbos (13mm ring spanner).
- Refit the bolt securing the steady bracket to the turbo (13mm spanner).
- On water-cooled turbos, using a new copper washer, refit the top coolant
pipe to the cylinder head and the lower coolant pipe to the turbo and water
pump (12mm spanner).
- Refit the oil return pipe to the cylinder block and, using a new gasket,
refit the flange to the turbo (Torx T25 or 10mm socket).
- Using an oil can or similar, fill the turbo bearing housing with oil through
the oil feed inlet. Important: there must be oil in the bearing housing
when the engine is started!
- Using a new copper washer at the turbo and a new sealing washer at the cylinder
block, refit the oil feed pipe to the turbo and the cylinder block (12mm spanner).
- Apply a bead of copper grease inside the mouth of the exhaust downpipe.
This performs the dual function of helping the downpipe seat squarely on the
turbo and, once the grease evaporates to leave the copper behind, sealing
the joint. Mate the downpipe to the turbo and fit new nuts. These should be
copper, self-locking nuts as supplied by Saab (the original nuts might not
look like copper, but they turn black with seconds of running the engine).
They have a crimp at the top of the nut. Steel nuts are not suitable, as they
will quickly loosen due to the intense thermal cycling, even if spring washers
are fitted.
Torque the nuts as near as possible to 25Nm (18lbft).
- Refit the outlet hose to the compressor.
- On cars fitted with the T3 turbo:
Refit the air conditioning compressor (if fitted). Refit and re-tension the
air conditioning compressor drivebelt.
Refit the oil cooler upper union and refit the oil line mounting bolt.
Top up the oil level.
- Refit the radiator fan assembly (8mm socket) and reconnect the wiring.
- On all cars other than LPT models, refit the boost control valve (Torx T30),
refit the "C" hose to the compressor and the "W" hose
to the wastegate actuator. Reconnect the control valve wiring.
- Refit the inlet hose to the compressor.
- On cars fitted with an air mass meter, refit the air
mass meter and reconnect the wiring.
- If a new or reconditioned turbo is being fitted, drain and replace the oil
and replace the oil filter. This will help to protect the new bearing while
it is running in.
- Top up the coolant.
- Start the engine and check for coolant and oil leaks. Allow to idle for
a few minutes to allow the copper grease to dry out.
- Check, and if necessary adjust, the basic boost
pressure.
|