|
Introduction
The handbrake on the Saab 9000 is a mechanical, cable-operated type,
acting on the rear calipers. Two cables are used, each running from
the handbrake lever in the cabin to one of the rear calipers. Adjustment
of the handbrake depends both on the rear caliper adjustment and on
the adjustment of the two cables. In almost every case, the reason adjustment
is required is because of excess travel at the handbrake lever.
A handbrake cable that is too loose will also give rise to too much
travel in the brake pedal and reduced braking force at the respective
caliper.
Time required
This procedure took about 20 minutes per side. As usual, double this
for the first side if you haven't done it before.
Tools required
As usual, I assume some basic tools, such as a jack, axle stands, socket
set, etc. However I do not assume you will already have all the necessary
metric socket and spanner sizes, especially if you are in the USA. Here
is a list so you can make sure you have all the necessary sizes before
you start.
- T-25 Torx® driver
- 4mm hexagon bit or Allen key
- 14mm socket or spanner
- 17mm socket
Procedure
Perform this procedure on th right-hand wheel first, then repeat for
the left-hand wheel.
- Jack up the rear of the car and place it on axle stands. If you
are not sure where you can safely place the jack and axle stands on
a 9000, go here for more information.
- Remove the roadwheel.
- If the handbrake is applied, release it.
- Remove the dust plug on the rear of the caliper (near the handbrake
cable) using a 14mm spanner. This will reveal a 4mm Allen screw. (Photos
taken from within the wheel well).
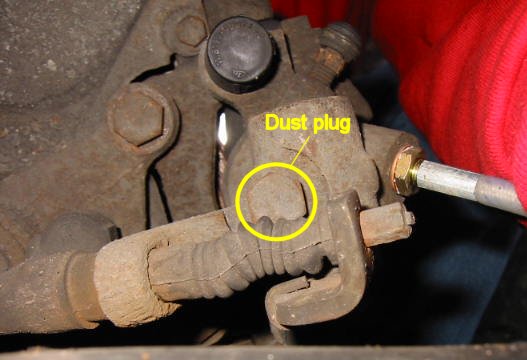
- Using a 4mm Allen key or hexagon bit, locate the screw under the
dust cover and rotate it move the pads against the disc, then turn
anticlockwise a quarter turn or until the disc can just be moved by
hand.
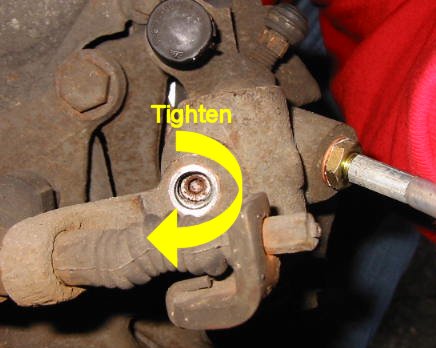
- Refit the dust plug.
- Remove the pads. Girling pads simply slide out, as does the outboard
ATE pad. The inboard ATE pad clips into the piston. Pull it directly
out of the piston to remove.
- If you wish to remove and replace the brake disc (rotor), this is
the time to do it. Click here for the
procedure.
- Fit the new pads as a straightforward reversal
of removal. My ATE pads came with a spring clip for the inboard pad
and a self-adhesive pad on the outboard pad. If you have a self-adhesive
pad backing, remove the backing paper before installation. If not,
smear the backing plate of the outboard pad (and inboard pad for Girling
calipers) with copper grease to help suppress any brake squeal.
- Reposition the caliper and, for ATE calipers, refit the spring clip.
- Smear the sliding pin(s) with copper grease and refit. Tighten them
snugly.
- Refit the plastic plugs.
- Refit the roadwheel.
- Lower the car.
- Torque the roadwheel bolts to 120Nm
(90lbft).
- Press the brake pedal repeatedly to move the pads back onto the
discs. If you don't do this, the brakes won't work the first time
you use them (and there may never be a second time!)
- Check the fluid level in the master cylinder reservoir. Top it up
to MAX if necessary.
- The brakes will not perform well for the first hundred miles or
so until the pads bed in. This seems to take longer if the discs are
new as well. With new discs and pads, be especially careful
for the first few miles. The performance of mine after doing all four
wheels was pathetic for a few miles. I have since adopted the practice
of doing the front discs and pads, driving for a few miles to get
them working, then doing the rear pads and discs and going for another
test drive. This is a bit safer and less harrowing.
|